Difference between revisions of "Mark2 Assembly"
| Line 51: | Line 51: | ||
=== X Carriage === | === X Carriage === | ||
=== HotEnd === | === HotEnd === | ||
E3D have detailed instructions for assembling both the [http://wiki.e3d-online.com/wiki/E3D-Lite6_Assembly Lite6] and [http://wiki.e3d-online.com/wiki/E3D-v6_Assembly V6] HotEnds available online. Follow the instructions they provide, but don't yet insert the PTFE tubing or power up the HotEnd. Leave the fan separate for the time being. | |||
=== Extruder === | === Extruder === | ||
Revision as of 01:27, 8 September 2015
Getting Started
First things first - thanks for your support! We appreciate your business, and hope that your experience with our printer is a happy and productive one! If you get stuck, and you can't find the answer you need here, feel free to contact us - we'd be happy to help!
To get started, find yourself a nice, open space to work - a table or workbench is ideal. Open up your kit, and grab all of the included parts out and arrange them nearby. After unboxing everything, take the time to compare the included bill-of-materials (BOM) against the contents of the kit. We work hard to make sure everything you need is in the box, but it's good to double check. Many components come inside one of the labelled boxes - if you're having trouble finding a part, check the BOM to find out which box it should be in.
Once you've got that sorted, it's time to get the acrylic parts ready. You'll want to peel the protective paper coating off of the acrylic before putting the printer together. Using a sharp knife or fine pair of tweezers can make it easier to separate the paper from the acrylic. This can take a little while - whether you want to do it all in one go, or bit-by-bit as you assemble the printer is up to you.
General Notes
Here are a few important notes before we proceed with assembly.
Our acrylic frame is as sturdy as they come, but over-tightened screws can still cause damage. Spring washers significantly reduce the chance of damage, and ensure that bolts stay tight long after assembly. Be sure to use one of the included spring-washers on every bolt that comes into contact with the Acrylic frame.
Test all linear bearings before using them by running them along one of the included smooth rods - sometimes they have too much grease applied internally, which can make them resistant at first. If this is the case, rinse the bearing under water briefly, dry as best as possible, and try running along the smooth rod again. Over time the grease will spread through the bearing, making them smoother - running the bearing along the rod a few times may help. Generally, after rinsing and some motion, the bearings should be smooth enough to move under gravity when the rod is held vertically.
Many of the diagrams on this page are animated - click on them to see the animation.
Main Frame Assembly
Z Motor Brackets
Requires:
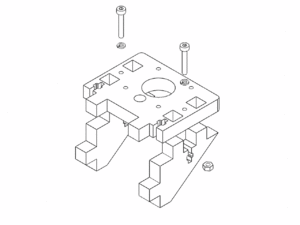
- z-motor-brace x 4
- z-motor-bracket x 2
- M3x20mm Hex Cap Bolt x 4
- M3 Spring Washer x 4
- M3 Hex Nut x 4
Assemble both Z Motor Brackets as shown in the image.
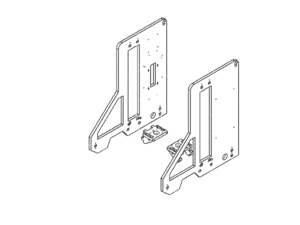
Requires:
- Assembled Z Bracket x 2
- M3x20mm Hex Cap Bolt x 4
- M3 Spring Washer x 4
- M3 Hex Nut x 4
Install the brackets onto the side panels. Take note that the side panel with the mounting holes for the controller goes on the left, and the panel with the mounting holes for the PSU on the right.
Side Panels
Front Panels
LCD Addon
Y Axis
Bed Support Plate
Y Motor and Idler
Y Endstop
Y Belt
Heated Bed
Wiring
Extruder Assembly (Single Extruder)
X Carriage
HotEnd
E3D have detailed instructions for assembling both the Lite6 and V6 HotEnds available online. Follow the instructions they provide, but don't yet insert the PTFE tubing or power up the HotEnd. Leave the fan separate for the time being.

